Text
Words, characters and fonts
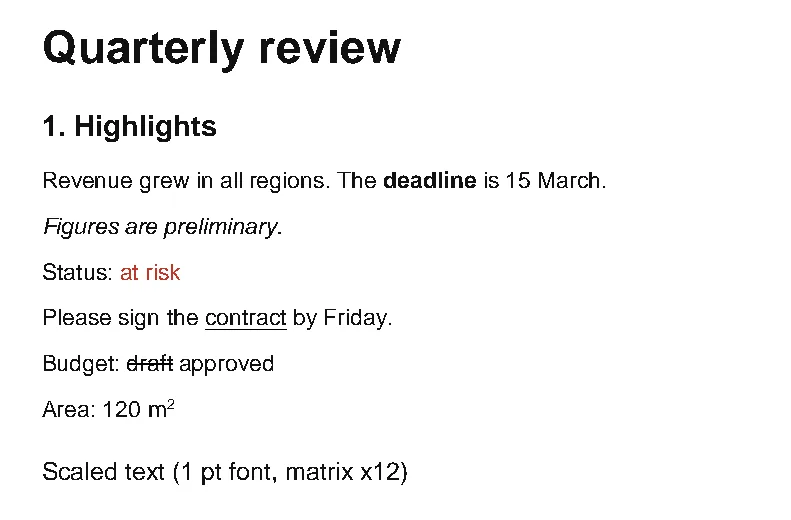
Below the text sits a list of characters, each with a font, a size, a colour and a box. With extract_words() and a few lines of code that turns into headings, bold labels, red warnings, underlined terms and superscripts. Every technique here was tested on a sample built to contain each case.
Short answer
Ask extract_words() to keep the properties you care about; each word then carries them and is split wherever they change:
import pdfplumber

with pdfplumber.open("samples/styled-text.pdf") as pdf:
    words = pdf.pages[0].extract_words(extra_attrs=["fontname", "size"])

for w in words[:9]:
print(f"{w['text']:12} {w['fontname']:18} {w['size']:5.1f}")Quarterly Helvetica-Bold 22.0
review Helvetica-Bold 22.0
1. Helvetica-Bold 14.0
Highlights Helvetica-Bold 14.0
Revenue Helvetica 11.0
grew Helvetica 11.0
in Helvetica 11.0
all Helvetica 11.0
regions. Helvetica 11.0Everything on this page uses styled-text.pdf, a fictional sample containing headings, bold, italic, colour, an underline, a strike-through, a superscript and matrix-scaled text.
extract_words() options
Besides the tolerances explained on extract text, three options change how words are cut. Shown on the invoice’s top-right block:
import pdfplumber

with pdfplumber.open("samples/invoice.pdf") as pdf:
    page = pdf.pages[0]
    line = [w["text"] for w in page.extract_words() if 58 < w["top"] < 112 and w["x0"] > 400]
    print("default:             ", line)
    words = page.extract_words(split_at_punctuation=True)
    print("split_at_punctuation:", [w["text"] for w in words if 58 < w["top"] < 112 and w["x0"] > 400][:8])
    words = page.extract_words(keep_blank_chars=True)
print("keep_blank_chars: ", [w["text"] for w in words if 58 < w["top"] < 112 and w["x0"] > 400])default: ['Invoice', 'no.', 'INV-2026-0417', 'Issue', 'date', '2026-10-03']
split_at_punctuation: ['Invoice', 'no', '.', 'INV', '-', '2026', '-', '0417']
keep_blank_chars: ['Invoice no.', 'INV-2026-0417', 'Issue date', '2026-10-03']| Option | Effect |
|---|---|
split_at_punctuation=True |
Also split at every character in string.punctuation; or pass your own string of characters |
keep_blank_chars=True |
Spaces become part of words, so a word runs until a real gap: good for “label: value” layouts |
extra_attrs=[...] |
Split when any listed char property changes, and add those properties to each word |
use_text_flow=True |
Follow the PDF’s drawing order instead of position |
return_chars=True |
Add each word’s characters under "chars" |
expand_ligatures |
True by default: fi → fi |
Headings by font size
Body text is the most common size; headings are larger. Comparing each line’s largest character with the median gives a document outline:
import statistics
import pdfplumber

with pdfplumber.open("samples/styled-text.pdf") as pdf:
    lines = pdf.pages[0].extract_text_lines()     # each line includes its chars

body = statistics.median(c["size"] for line in lines for c in line["chars"])
for line in lines:
    size = max(c["size"] for c in line["chars"])
    if size > body * 1.15:
        level = "H1" if size > body * 1.6 else "H2"
        print(f"{level} ({size:.0f} pt): {line['text']}")
print("body size:", body)H1 (22 pt): Quarterly review
H2 (14 pt): 1. Highlights
body size: 11.0On real documents, combine size with boldness and with position (a heading starts a block after a vertical gap). That is also how to split a document into sections for RAG chunking.
Bold and italic
PDFs do not have a “bold” flag; they have fonts. Bold and italic faces are separate fonts whose names say so:
import pdfplumber

def style(fontname):
    name = fontname.split("+")[-1].lower()          # drop subset prefixes like ABCDEF+
    bold = any(k in name for k in ("bold", "black", "heavy", "semibold", "demi"))
    italic = any(k in name for k in ("italic", "oblique"))
    return ("bold " if bold else "") + ("italic" if italic else "") or "regular"

with pdfplumber.open("samples/styled-text.pdf") as pdf:
    for w in pdf.pages[0].extract_words(extra_attrs=["fontname"]):
        if style(w["fontname"]) != "regular":
print(f"{w['text']:12} {style(w['fontname'])}")Quarterly bold
review bold
1. bold
Highlights bold
deadline bold
Figures italic
are italic
preliminary. italicFont names often carry a six-letter subset prefix (ABCDEF+Arial-BoldMT), which the function strips. Two exceptions to watch for:
- Fake bold. Some producers draw regular text twice, slightly offset. The font name is not bold, but every character appears twice (doubled letters); count duplicates with
page.dedupe_chars()to detect it. - Stroked text. Text can be thickened by also stroking its outline (text render mode 2). pdfplumber does not expose the render mode, so a font-name test cannot see this case.
Colour
import pdfplumber

with pdfplumber.open("samples/styled-text.pdf") as pdf:
    words = pdf.pages[0].extract_words(extra_attrs=["non_stroking_color"])

normal = max(set(w["non_stroking_color"] for w in words), key=[w["non_stroking_color"] for w in words].count)
for w in words:
    if w["non_stroking_color"] != normal:
print(w["text"], w["non_stroking_color"])at (0.752941, 0.223529, 0.168627)
risk (0.752941, 0.223529, 0.168627)
Fictional (0.4, 0.4, 0.4)
sample (0.4, 0.4, 0.4)
generated (0.4, 0.4, 0.4)
for (0.4, 0.4, 0.4)
pdfplumber.dev (0.4, 0.4, 0.4)
(CC0). (0.4, 0.4, 0.4)The most frequent colour is the body text; anything else is worth a look. Here the red at risk and the grey footer stand out. Colour values depend on the colour space, so compare them exactly as reported (colours).
Underline and strike-through
Underlines and strike-throughs are not text properties either; they are lines drawn near the text. Match each word with horizontal lines that span most of its width, and look at where the line sits:
import pdfplumber

with pdfplumber.open("samples/styled-text.pdf") as pdf:
    page = pdf.pages[0]
    rules = [l for l in page.lines if abs(l["top"] - l["bottom"]) < 0.5]   # horizontal lines
    for w in page.extract_words():
        for r in rules:
            overlap = min(w["x1"], r["x1"]) - max(w["x0"], r["x0"])
            if overlap < 0.8 * (w["x1"] - w["x0"]):
                continue
            height = w["bottom"] - w["top"]
            if w["bottom"] - 1 <= r["top"] <= w["bottom"] + 3:
                print("underlined:     ", w["text"])
            elif w["top"] + 0.3 * height < r["top"] < w["bottom"] - 0.2 * height:
print("struck through: ", w["text"])underlined: contract
struck through: draftSome producers draw these as thin filled rectangles rather than lines; include page.rects with a small height in the same test. Table borders under a cell produce false underlines, so limit the check to running text.
Superscripts and subscripts
import pdfplumber

with pdfplumber.open("samples/styled-text.pdf") as pdf:
    for line in pdf.pages[0].extract_text_lines():
        sizes = [c["size"] for c in line["chars"]]
        base = max(sizes)
        bottoms = max(c["bottom"] for c in line["chars"] if c["size"] == base)
        for c in line["chars"]:
            if c["size"] < 0.8 * base and c["bottom"] < bottoms - 1:
print(f"superscript {c['text']!r} after {line['text'][:-1]!r}")superscript '2' after 'Area: 120 m'A character noticeably smaller than its line and raised above the baseline is a superscript (footnote markers, units, exponents); one lowered below it is a subscript. extract_text() joins it to the previous word (m2), which is usually what you want for search but not for display.
Font size versus what Acrobat shows
pdfplumber reports the effective size: the font size multiplied by the text matrix. This sample sets a 1 pt font and scales it 12 times, a pattern some producers use for every piece of text:
import pdfplumber

with pdfplumber.open("samples/styled-text.pdf") as pdf:
    char = next(c for c in pdf.pages[0].chars if c["text"] == "S" and c["top"] > 260)

# The PDF sets a 1 pt font and scales it x12 with the text matrix
print("size:", round(char["size"], 2), "| matrix:", char["matrix"][:4])size: 12.0 | matrix: (12.0, 0.0, 0.0, 12.0)Tools that show the raw font operator would say 1 pt. pdfplumber’s value matches what you see on the page, which is the useful number for finding headings. Differences can remain with non-uniform scaling (stretched or condensed text); the matrix holds the exact transformation.