Beyond text
Images and page renders
pdfplumber deals with images in two ways. page.images tells you where each embedded image is and gives you its data, and page.to_image() renders what the page looks like. Each has a default that quietly costs quality, and both are measured below on a sample made for the purpose.
Short answer
page.images lists every image drawn on the page, with its position, the pixel size stored in the file and the stream that holds its data:
import pdfplumber

with pdfplumber.open("samples/images.pdf") as pdf:
    for page in pdf.pages:
        for img in page.images:
            w_px, h_px = img["srcsize"]                # pixels stored in the file
            dpi = w_px / (img["width"] / 72)           # pixels per inch as drawn on the page
            fmt = "+".join(f.name for f, _ in img["stream"].get_filters())
            print(f"p{page.page_number}  {w_px}x{h_px} px  drawn {img['width']:.0f}x{img['height']:.0f} pt"
f" at x0={img['x0']:.0f} top={img['top']:.0f} {dpi:.0f} dpi {fmt}")p1 240x240 px drawn 36x36 pt at x0=54 top=42 480 dpi FlateDecode
p1 900x600 px drawn 324x216 pt at x0=54 top=144 200 dpi DCTDecode
p2 240x240 px drawn 36x36 pt at x0=54 top=42 480 dpi FlateDecode
p2 64x40 px drawn 288x180 pt at x0=54 top=140 16 dpi FlateDecodeThe sample is images.pdf: a JPEG photo, a transparent PNG logo that appears on both pages, and a chart pasted at thumbnail size and stretched. All three were generated for this page.
What each image entry tells you
Images have the same position keys as every other object (x0, top, x1, bottom, in points; see objects). Three more keys are specific to images:
srcsize: the pixels stored in the PDF,(width, height).width,height: the size it is drawn at, in points. Dividing pixels by inches drawn gives the effective resolution: the logo is 480 dpi, the photo 200 dpi and the chart 16 dpi, which is why the chart prints blocky.stream: the pdfminer.six stream with the image data, plusbits,colorspaceandimagemasktaken from it.
The logo shows up on both pages with the same name. It is one object in the file, drawn twice. Deduplicate on img["stream"].objid when you extract, or you save a copy of every letterhead logo per page.
Save images in their original format
How you get a usable file depends on how the image is compressed, which stream.get_filters() tells you:
- JPEG (
DCTDecode):stream.get_data()is a complete.jpgfile. Write the bytes as they are; re-encoding only loses quality. - Flate (
FlateDecode, the usual compression for PNG-like images):get_data()returns raw pixels, not a file. Build a Pillow image from them, and attach the soft mask (SMask) as the alpha channel if there is one. - CCITT and JBIG2 (black-and-white scans): pdfminer.six’s
ImageWriterdecodes CCITT to a.bmp, and writes JBIG2 out as a.jb2file without decoding it.
This function covers all three, and falls back to ImageWriter for everything it does not handle itself:
import io
from pathlib import Path

import pdfplumber
from pdfminer.image import ImageWriter
from pdfminer.layout import LTImage
from pdfminer.pdftypes import resolve1
from PIL import Image

def to_pil(stream):
    """The image as stored in the PDF, with its transparency, or None if unsupported."""
    filters = [f.name for f, _ in stream.get_filters()]
    if filters and filters[-1] == "DCTDecode":                 # JPEG: the bytes are a .jpg
        return Image.open(io.BytesIO(stream.get_data()))
    if filters and filters[-1] not in ("FlateDecode", "LZWDecode"):
        return None                                              # JPX, JBIG2, CCITT, ...
    size = (stream["Width"], stream["Height"])
    space = getattr(resolve1(stream.get("ColorSpace")), "name", None)
    mode = {("DeviceRGB", 8): "RGB", ("DeviceGray", 8): "L", ("DeviceGray", 1): "1"}.get(
        (space, stream.get("BitsPerComponent")))
    if mode is None:
        return None                                              # Indexed, ICCBased, CMYK, ...
    img = Image.frombytes(mode, size, stream.get_data())
    smask = resolve1(stream.get("SMask"))
    if smask is not None:                                        # soft mask = alpha channel
        img.putalpha(Image.frombytes("L", size, smask.get_data()))
    return img

def save_images(pdf_path, out):
    out = Path(out)
    out.mkdir(exist_ok=True)
    writer, seen, saved = ImageWriter(str(out)), set(), []
    with pdfplumber.open(pdf_path) as pdf:
        for page in pdf.pages:
            for i, img in enumerate(page.images):
                stream = img["stream"]
                if stream.objid in seen:          # same object drawn again (a logo on every page)
                    continue
                seen.add(stream.objid)
                name = f"page{page.page_number}-{i}"
                pil = to_pil(stream)
                if pil is None:                   # pdfminer decodes CCITT and JBIG2 itself
                    bbox = (img["x0"], img["top"], img["x1"], img["bottom"])
                    saved.append(writer.export_image(LTImage(name, stream, bbox)))
                elif pil.format == "JPEG":
                    (out / f"{name}.jpg").write_bytes(stream.get_data())  # original bytes
                    saved.append(f"{name}.jpg")
                else:
                    pil.save(out / f"{name}.png")
                    saved.append(f"{name}.png ({pil.mode})")
    return saved

print(save_images("samples/images.pdf", "extracted"))
scans = save_images("samples/real/federal-register-2020-17221.pdf", "extracted-fr")
print(len(scans), "images, e.g.", scans[0])['page1-0.png (RGBA)', 'page1-1.jpg', 'page2-1.png (RGB)']
11 images, e.g. page7-0.bmpThe logo keeps its transparent corners, and the JPEG is the exact embedded file. The second document is a real Federal Register notice: its 11 images are black-and-white scans at about 300 dpi compressed with CCITT, which ImageWriter decodes in pure Python. That decoding is most of the several seconds this example takes.
Those scans also contain text, which extract_text() cannot see because it is pixels. If a page’s words are inside images, you need OCR.
stream.rawdata is the still-compressed data. For anything except JPEG it is not an image file, which is the cause of “cannot identify image file” errors when people pass it to Pillow (#1207).
Render an image region instead
When you want the image as it appears (clipped, masked and scaled), or its format is one the function skips (Indexed, ICCBased or CMYK colour), crop the page to the image’s box and render that:
import pdfplumber

with pdfplumber.open("samples/images.pdf") as pdf:
    for page, n in [(pdf.pages[0], 1), (pdf.pages[1], 1)]:
        img = page.images[n]
        region = page.crop((img["x0"], img["top"], img["x1"], img["bottom"]))
        shot = region.to_image(resolution=200)
        shot.save(f"render-p{page.page_number}.png", quantize=False)
print(f"page {page.page_number}: stored {img['srcsize']} px, rendered {shot.original.size} px")page 1: stored (900, 600) px, rendered (900, 600) px
page 2: stored (64, 40) px, rendered (800, 500) pxRendering at 200 dpi gives the photo’s stored 900 × 600 pixels exactly. The chart becomes 800 × 500 pixels, but it still holds only the detail of its 64 × 40 original: rendering can enlarge an image, not add to it. Check srcsize before you promise anyone a sharp picture.
crop() does not make rendering cheaper. pdfplumber renders the whole page at the requested resolution and then cuts out the box, so rendering ten regions of one page means ten full-page renders. Render once and crop the Pillow image yourself when you need many regions.
Save a page as PNG
to_image() takes resolution (pixels per inch, 72 by default) or a target width or height in pixels, one of the three:
import os

import pdfplumber
from PIL import Image

with pdfplumber.open("samples/images.pdf") as pdf:
    page = pdf.pages[0]
    print(page.to_image(width=1000).original.size)      # or give a width in pixels
    im = page.to_image(resolution=150)                  # pixels per inch; the default is 72
    print(im.original.size)
    im.save("page-default.png")                         # quantize=True: 256-colour palette
    im.save("page-full.png", quantize=False)            # every colour kept

for name in ["page-default.png", "page-full.png"]:
    colours = len(Image.open(name).convert("RGB").getcolors(1 << 24))
print(f"{name:17} {colours:>6} colours {os.path.getsize(name) // 1024} KB")(1000, 1295)
(1275, 1651)
page-default.png 112 colours 24 KB
page-full.png 3993 colours 105 KBThe default save() reduced the page to 112 colours. pdfplumber quantizes to a palette of up to 256 colours unless you pass quantize=False, which keeps files small for debugging pictures of text and lines. On photos and gradients it bands:
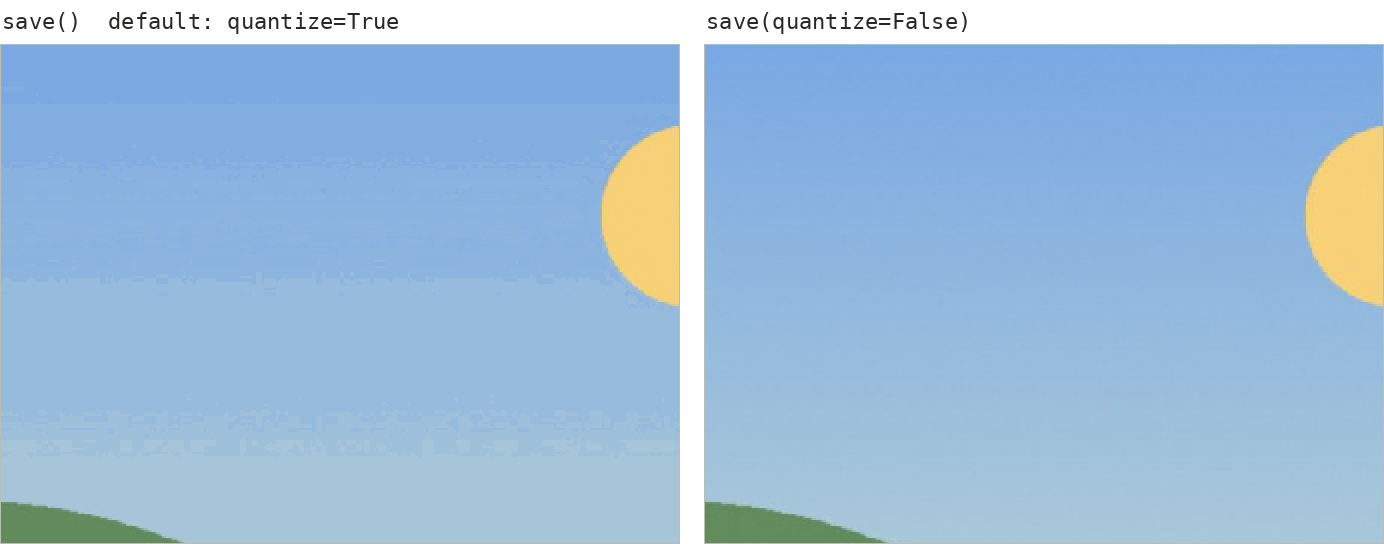
Rendering has a second default to know about: text and lines are not antialiased. That keeps edges crisp for checking positions, but looks rough at low resolution:

A US Letter page at 300 dpi is 2550 × 3300 pixels, about 25 MB of RGB in memory. For OCR, 300 dpi is the usual choice; for previews and debugging, 100–150 dpi is plenty.
Use the render in your own code
PageImage.original is the Pillow image, without any debugging drawings (those go on annotated). From there it is one line to NumPy or to bytes in memory, with no temporary file:
import io

import numpy as np
import pdfplumber

with pdfplumber.open("samples/images.pdf") as pdf:
    im = pdf.pages[0].to_image(resolution=100)

pil = im.original                 # a PIL.Image: the page as rendered, without drawings
arr = np.asarray(pil)             # for OpenCV, scikit-image, a model's preprocessing
buf = io.BytesIO()
im.save(buf, quantize=False)      # PNG bytes in memory, e.g. for an HTTP response
print(type(pil).__name__, pil.mode, arr.shape, len(buf.getvalue()), "bytes")Image RGB (1100, 850, 3) 66978 bytesIn Jupyter, a PageImage as the last expression of a cell displays itself. In a script, im.show() opens it in the system viewer. Visual debugging covers drawing objects and table finder results on top of it.
Errors about Wand, ImageMagick or Ghostscript
Before version 0.10.0, to_image() rendered pages with ImageMagick through the Wand package, which in turn needed Ghostscript. That produced a family of installation errors:
ImportError: MagickWand shared library not found(#81)wand.exceptions.DelegateError(#104, #95)MagickReadImage returns false, but did not raise ImageMagick exception(#144)
Since 0.10.0, rendering uses pypdfium2, a self-contained wheel that pip installs with pdfplumber. If you see any of these messages, the fix is to upgrade (python -m pip install -U pdfplumber), not to install ImageMagick. Old tutorials that tell you to apt install ghostscript imagemagick for pdfplumber are out of date.