Beyond text
Visual debugging
Most extraction problems are obvious once you can see them: a word split in two, a ruling line that stops short, a column boundary through the middle of a number. pdfplumber can draw its own view of a page in a couple of lines. Every image on this page was saved by the code above it.
Short answer
Render the page with to_image(), draw the objects you want to check, and save or display the result:
import pdfplumber

with pdfplumber.open("samples/invoice.pdf") as pdf:
    page = pdf.pages[0]
    im = page.to_image(resolution=110)
    im.draw_rects(page.extract_words())      # blue fill, red outline by default
    im.save("words.png")
print(im.original.size, "pixels;", len(page.extract_words()), "words outlined")(935, 1210) pixels; 151 words outlined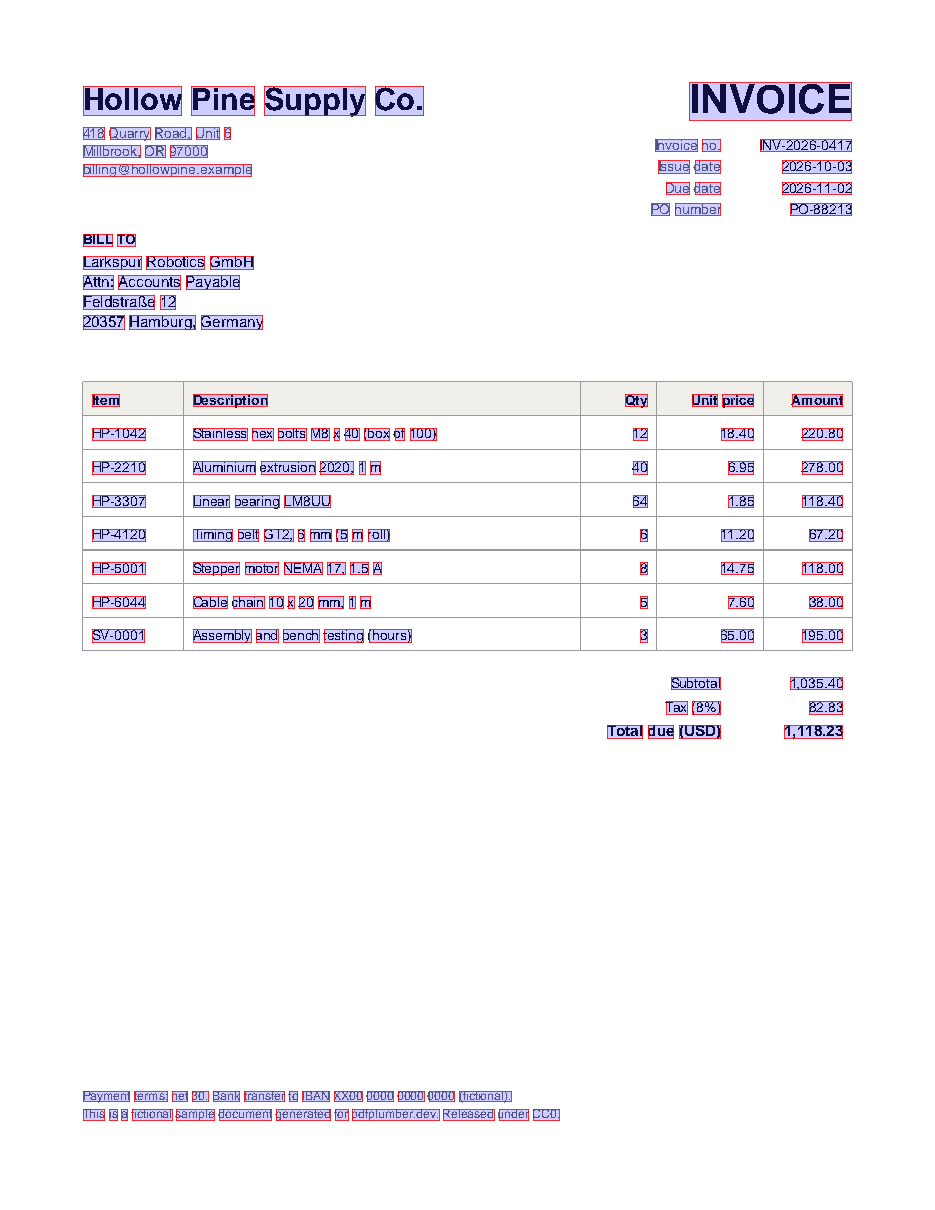
Every drawing method returns the image again, so calls can be chained, and all of them take pdfplumber objects or plain coordinates in points.
The drawing methods
| Method | Draws | Takes |
|---|---|---|
draw_rect(s) |
Boxes | Objects with x0, top, x1, bottom, or (x0, top, x1, bottom) tuples |
draw_line(s) |
Lines | Line or curve objects (curves follow their pts), or lists of points |
draw_circle(s) |
Dots at the centre of each object | Objects or (x, y) points; radius in points |
draw_vline(s), draw_hline(s) |
Lines across the whole image | x or y positions |
outline_words(), outline_chars() |
Shortcuts for words and chars | outline_words accepts only x_tolerance and y_tolerance |
debug_tablefinder() |
Edges, intersections and cells of the table finder | The same table_settings you extract with |
Colours are Pillow colours: RGB or RGBA tuples, or strings such as "#e5482d" or "red". fill=None draws an outline only. The defaults are a translucent blue fill and a red outline.
Two units are mixed, which surprises people: stroke_width is in pixels of the image, while radius and all positions are in points on the page. A line at stroke_width=2 looks thinner at resolution=300 than at 72; a circle of radius 2 stays the same size relative to the page.
For words cut with other options (keep_blank_chars, extra_attrs, split_at_punctuation), draw them yourself: im.draw_rects(page.extract_words(keep_blank_chars=True)). outline_words() ignores everything except the two tolerances.
Characters, lines and styles together
Chaining several layers on a crop of the styled-text sample shows each character’s box, the two drawn lines (an underline and a strike-through) and their midpoints:
import pdfplumber

with pdfplumber.open("samples/styled-text.pdf") as pdf:
    page = pdf.pages[0].crop((40, 50, 420, 300))
    (page.to_image(resolution=150, antialias=True)
        .draw_rects(page.chars, stroke=(31, 91, 216, 160), fill=None)   # thin blue box per char
        .draw_lines(page.lines, stroke="#e5482d", stroke_width=3)        # drawn lines in red
        .draw_circles(page.lines, radius=2, fill="#e5482d")              # their midpoints
        .save("styles.png"))
print(len(page.chars), "chars,", len(page.lines), "lines")225 chars, 2 lines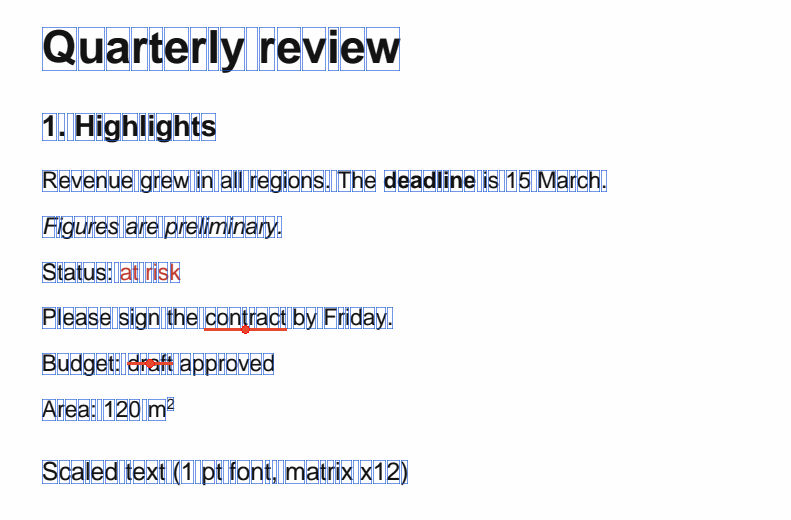
This is how the underline test on words, chars and fonts was checked: the red line sits under contract and through draft, exactly where the code measures it. Drawing on a cropped page uses the same page coordinates as everywhere else; the image simply shows only the crop.
Read debug_tablefinder()
When a table comes out wrong, debug_tablefinder() shows the three stages of table detection. Pass it the same settings you extract with. Here it is on the bank statement, first with default settings, then with column positions taken from the header:
import pdfplumber

with pdfplumber.open("samples/bank-statement.pdf") as pdf:
    page = pdf.pages[0].crop((30, 150, 565, 420))
    names = ("Date", "Description", "Debit", "Credit", "Balance")
    header = [w for w in page.extract_words() if w["text"] in names]
    gaps = [(a["x1"] + b["x0"]) / 2 for a, b in zip(header, header[1:])]
    columns = [header[0]["x0"] - 4, *gaps, header[-1]["x1"] + 4]
    explicit = {"vertical_strategy": "explicit", "explicit_vertical_lines": columns,
                "horizontal_strategy": "lines"}

    for name, settings in [("default.png", {}), ("explicit.png", explicit)]:
        page.to_image(resolution=110).debug_tablefinder(settings).save(name)
        f = page.debug_tablefinder(settings)
        print(f"{name:13} edges {len(f.edges):>3}  intersections {len(f.intersections):>3}"
f" cells {len(f.cells):>3} tables {len(f.tables)}")default.png edges 15 intersections 0 cells 0 tables 0
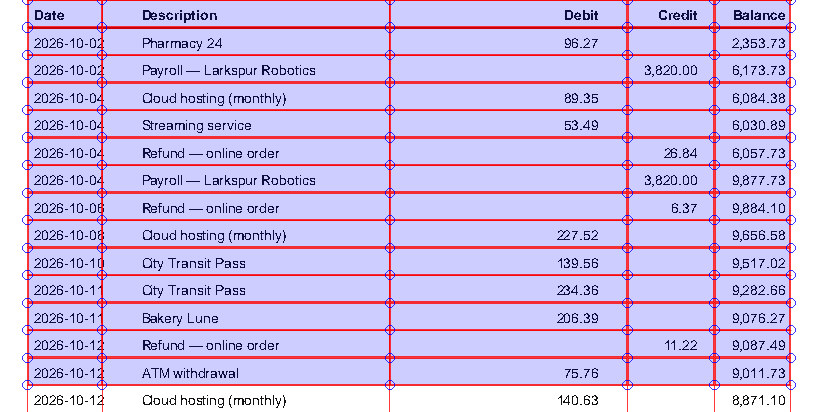
explicit.png edges 21 intersections 90 cells 70 tables 1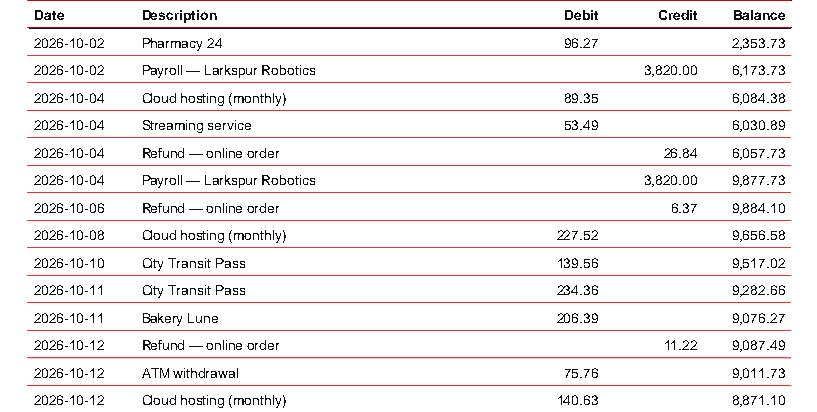
| You see | It means | Look at |
|---|---|---|
| Red lines | Edges: ruling lines and rectangle sides kept as table borders, plus any explicit lines | Missing red where you expect a border: the line is too short or filtered out (edge_min_length) |
| Blue circles | Intersections, where a horizontal and a vertical edge meet | Red lines with no circles: edges that miss each other (snap_tolerance, join_tolerance, intersection_tolerance) |
| Blue-filled boxes | Cells built from four intersections | Cells merged or missing: an intersection is missing at one corner |
The default run has red lines but no circles: the statement draws no vertical rules, so nothing intersects and no cell can form. The printed counts say the same thing in numbers, and page.debug_tablefinder(settings) gives you those edges, intersections, cells and tables as objects when you want to inspect them in code. The table settings guide shows the image for each tolerance problem.
Check column guesses before extracting
For borderless tables you often place column boundaries yourself. Draw them first. A boundary through a word splits it across two cells, and that is much easier to see than to find in the extracted rows:
import pdfplumber

with pdfplumber.open("samples/borderless-table.pdf") as pdf:
    page = pdf.pages[0].crop((50, 118, 590, 250))
    guesses = {
        "guess.png": [56, 150, 330, 410, 500, 586],   # first try: cuts through numbers
        "fixed.png": [56, 290, 357, 427, 497, 586],   # moved into the gaps
    }
    for name, columns in guesses.items():
        im = page.to_image(resolution=110).draw_vlines(columns, stroke="#1f5bd8", stroke_width=2)
        im.save(name)
        cut = [w["text"] for w in page.extract_words() for x in columns if w["x0"] < x < w["x1"]]
print(f"{name}: lines cut through {len(cut)} words {cut[:4]}")guess.png: lines cut through 7 words ['2026', '12,480', '8,930', '3,210']
fixed.png: lines cut through 0 words []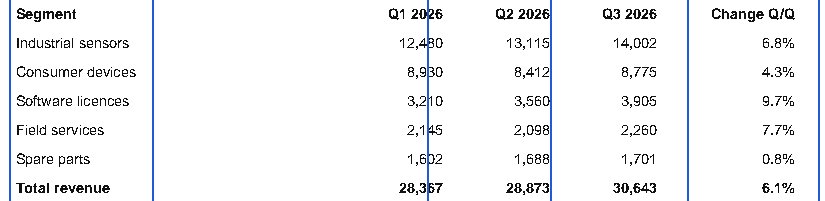
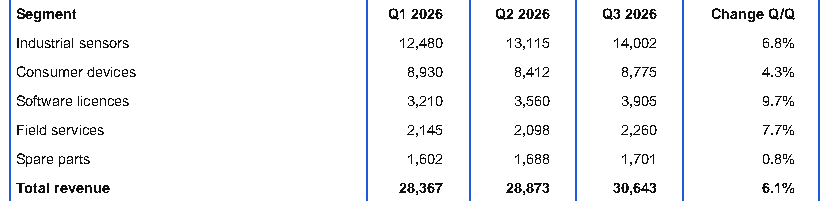
The first guess put boundaries at the left edge of each header, but the numbers are right-aligned and extend further left. The printed check counts words that a boundary cuts through, so you can apply the same test to every page of a batch without looking at each image.
Render once, draw many times
Rendering is the expensive step, and to_image() renders the full page even for a crop. When you want several pictures of one page, keep the PageImage and start each picture with reset(), which clears the drawings and keeps the render. copy() gives you an independent copy to draw on while keeping the original.
import pdfplumber

with pdfplumber.open("samples/invoice.pdf") as pdf:
    page = pdf.pages[0]
    im = page.to_image(resolution=150)                       # render once
    im.draw_rects(page.chars).save("chars.png")
    im.reset().draw_lines(page.lines).save("lines.png")      # same render, drawings cleared
    im.reset().draw_rects(page.rects).save("rects.png")
print(len(page.chars), "chars,", len(page.lines), "lines,", len(page.rects), "rects drawn on one render")851 chars, 15 lines, 1 rects drawn on one renderIn Jupyter, a PageImage that ends a cell is displayed inline:
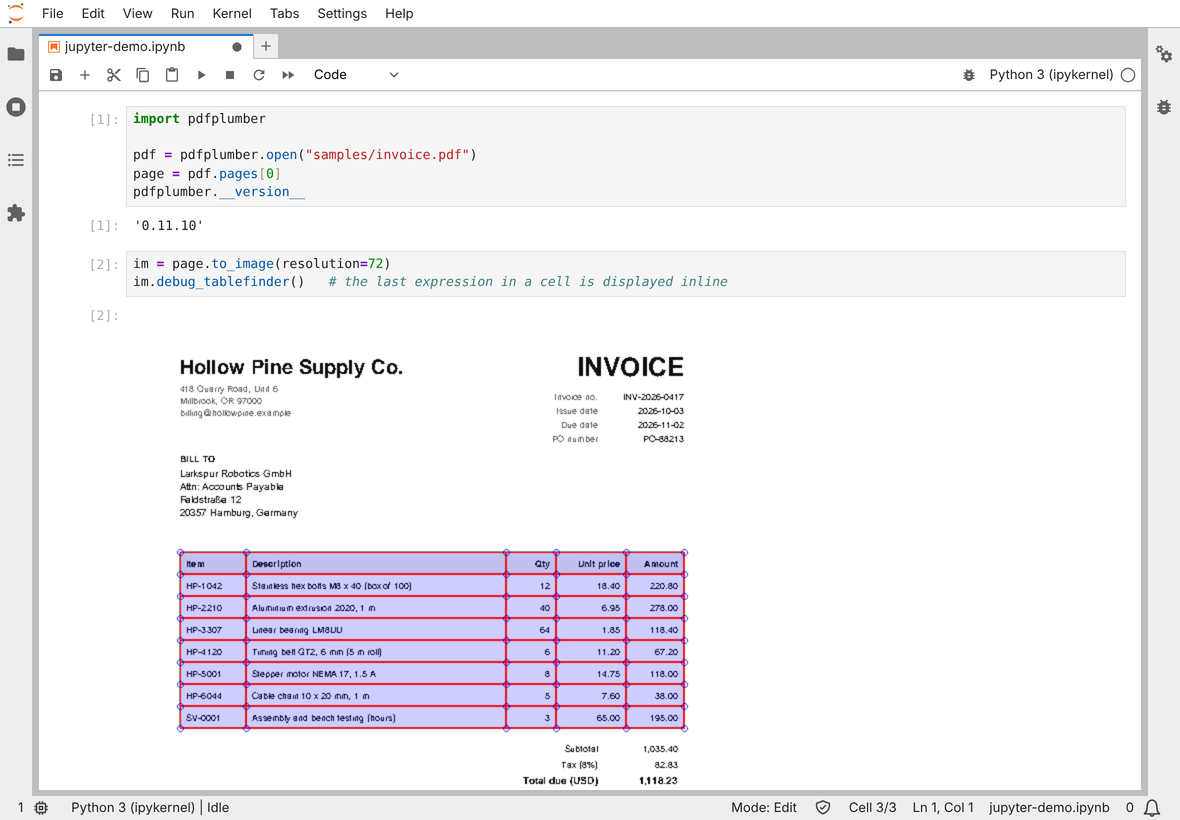
In a script, im.show() opens it in the system image viewer, and im.annotated is the Pillow image with your drawings on it (im.original without). Saving and rendering options, including the quantize and antialias defaults, are covered in images and page renders.